-
Some Responsive CSS
I often tend to prioritize functionality over form, but lately I’ve been wanting to make things I work on look just a little better. When I first started coding 5 years ago, there weren’t as many libraries that did heavy lifting defining breakpoints in a way that was lightweight and easy to work with (I didn’t have as much experience at the time, either).
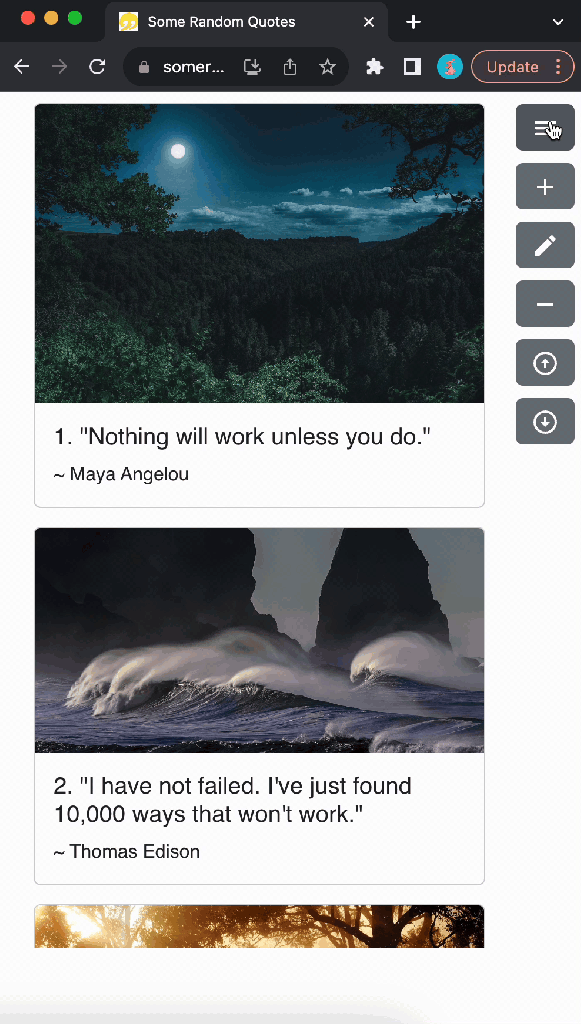
After not prioritizing it for a while, I decided to add some CSS responsiveness to one of my projects on AWS (somerandomquotes.com).
As a picture (gif) is worth 1000 words, here’s a quick image of the before:

When you drag the screen in, the view collapses and the sidebar is placed front and center. Only when you scroll to the bottom of the sidebar do you finally see the quotes displayed.
At the very least, in a small viewport without responsive handling, as a user, I’d want to see the quotes at the top and actions at the bottom, but there are obviously more ux+ui-friendly ways of handling that. My goal was to implement something intuitive.
Here’s what I eventually came up with:

Right off the bat, there’s a visible difference between that first gif and the second gif. Namely, the list of actions appears on the right. I did this for 2 reasons, one, I wanted to prioritize displaying the quotes, and 2, I found it easier to see the actions condensed ‘into’ a hamburger icon on the right side.
In order to get to the second gif, I had to:
- refactor the actions (CRUD + sorts), categories, and authors logic into its own component, sidebar.js (should have done this earlier anyways)
- split up the display of CRUD + sort actions from the list of categories and authors
- add logic and css to handle the categories + authors list sliding in and out
- refine the content breakpoints
Sidebar refactor
To me, the most interesting part of this work was getting the sidebar to slide in and out (I up-leveled my css knowledge!).
Here’s the sidebar up close.
To break it down, here’s the gist of the code (reduced for brevity):
Sidebar.js
const Sidebar = { isOpen, toggleSidebar } => {
    const windowSize = useWindowSize(); // a custom calculation hook
    const sidebarClass = isOpen ? "sidebar open" : "sidebar";

    return(
        <>
            {windowSize.width < 600
                ? <div>
                    <Button onClick={toggleSidebar}>
                        <HamburgerMenuIcon />
                    </Button>
                    <div className={sidebarClass} ...>
                        ~~ categories and authors list here ~~
                    </div
                </div>
                : ~~ view for larger screens ~~
            }
        <>
    );
}
Sidebar.css
.sidebar { position: absolute; left: -80vw; height: 100%; width: 60vw; transition: left 0.3s ease-in-out; z-index: 1; } .sidebar.open { left: 0; z-index: 1; }- if the window gets small enough (< 600px), the sidebar is instantiated
- the view with authors + categories is created to the left, out of view
- position is controlled by css: position: absolute, left: -80vw, and width: 60vw
- when the hamburger menu icon is clicked, the toggleSidebar function Sidebar.js is called. This changes the isOpen prop which controls the categories + authors sheet
- .sidebar to .sidebar.open changes position from left: -80vw to left: 0
- transition left: 0.3 ease-in-out gives a smooth transition in and out
Grid Breakpoints in Material UI
Aside from the sidebar, to add responsive sizing to my front end, I refined the breakpoint sizes provided by Material UI.
Here’s a reduction of an example:
Home.js
import { Col, Row } from 'reactstrap';
...
return (
    <>
        <Row>
            <Col lg={10} md={9} sm={8} xs={11}>
                <Quotes />
            </Col>
            <Col lg={2} md={3} sm={4} xs={1}>
                <Sidebar />
            </Col>
        </Row>
    <>
);
Within a given row, you can control the amount of room each column takes up for a screen size. The total of all columns in that row for a specified size should be no more than 12. Take lg={10} where <Quotes /> is rendered and lg={2} for <Sidebar />, for example. This means that for a large screen size (1200px – 1500px width), the quotes section should take up ~83% of screen real estate while the sidebar should be ~17%. Sizes range from xs to xl, and it’s possible to customize these breakpoints (link).
Some thoughts
One thing I’ve shied away from in past projects is responsive CSS. After this experience though, setting up responsive css, at least at a high level, isn’t that difficult. Going forward, I want to find more balance between making sure something works (well), and the presentation of the thing (organization + UI).
If I were to make additional ui adjustments to this project, I think I’d change the size, color, and effects on the different buttons. I’d also revisit sizing in the my modals.
As always, thanks for reading!
link to repo: https://github.com/timebreaker49/shiny-train
-
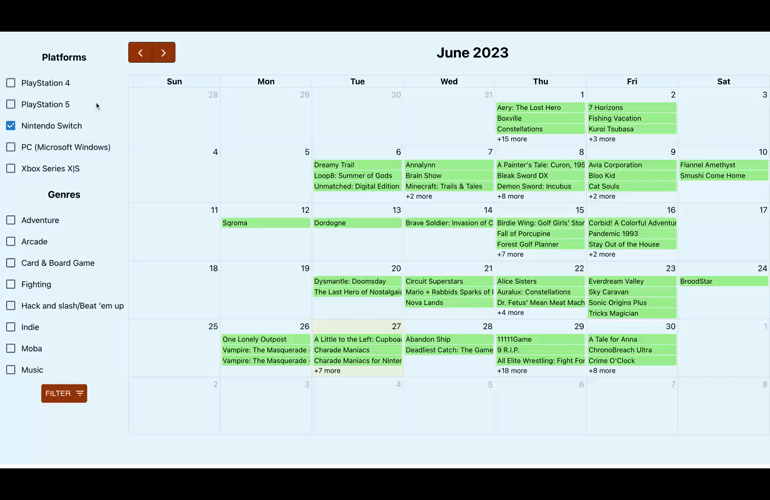
Games Cal: Google cal integration
For video game releases you’re interested in, a useful feature might be the ability to create reminders for dates that are coming up.
Recently, I’ve been working on a Google Calendar integration to create events and set reminders for upcoming games. I have some things I need to spend more time on, but a happy path flow (with pictures!) is below:
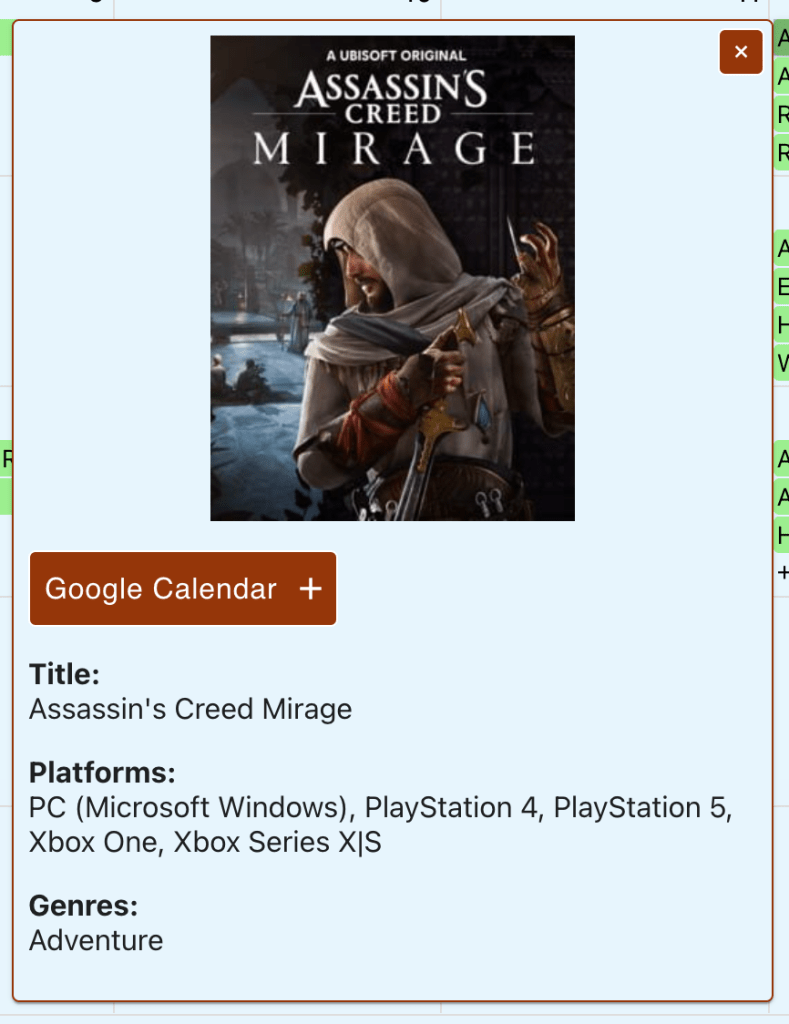
Feature: ‘Google Calendar +’ button is displayed in the game detail card
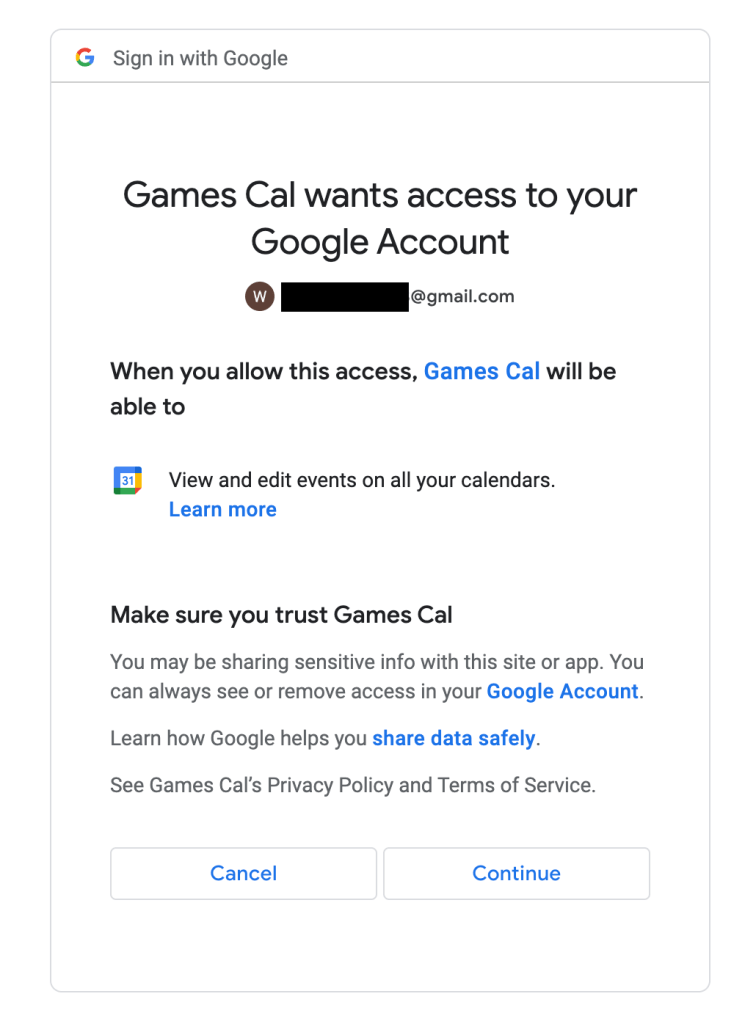
When visiting the site for the first time, you need to authorize permissions for the app to access a personal google calendar
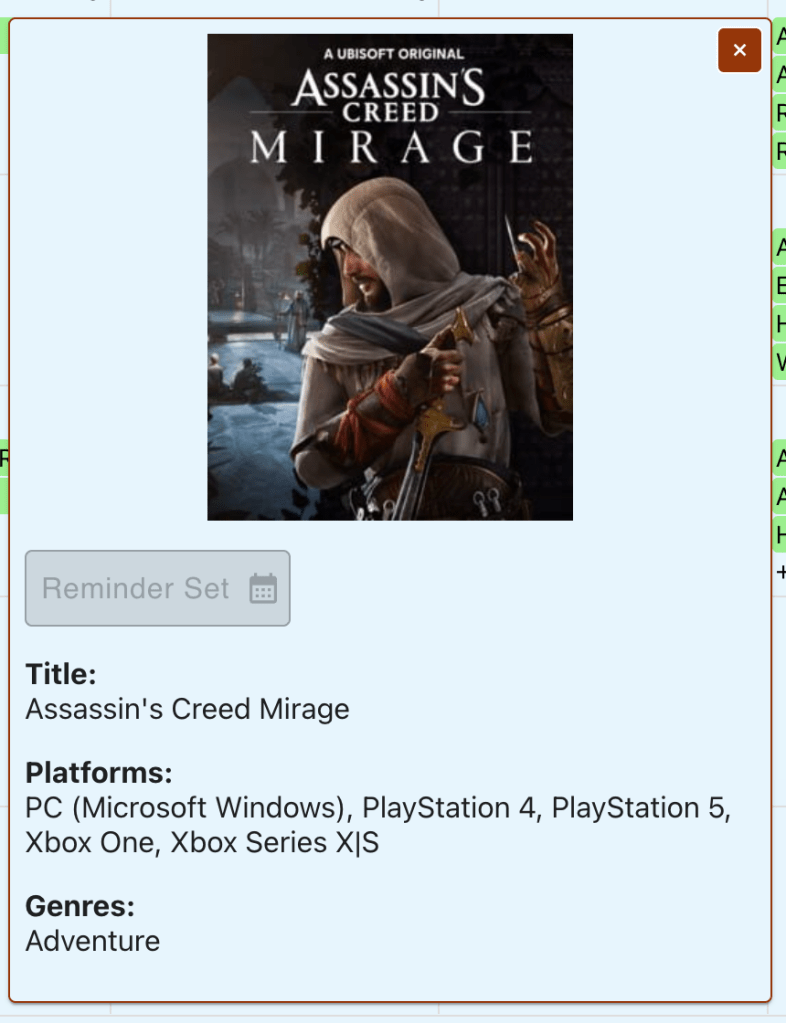
After authorization, if the call to create the event is successful, the button text + icon change and the button disabled
Opening up Google Calendar reveals that the event was successfully created!

The happy path is pretty straightforward, but there are some improvements and additional functionality I want to add to this over time.
Open questions – authentication + authorization
- Pickle vs. JSON: Currently, I’m using pickle to serialize credentials, but it’s not human-readable (for a tradeoff of being very fast / efficient). I might switch to JSON even though it comes with a bit more overhead, so I can dig into issues should they arise in this flow (JSON is also widely quite supported so I might want to switch just for that)
- Storing tokens: My python calendar service is looking for a credentials file before accessing the Google Calendar API. For more users, the service would have to fetch credentials + permissions for a specific user. In a production app, I would store and retrieve this info from a persistent database and probably avoid storing credentials in localstorage. I’ll likely implement something like this.
Additional event functionality
- Customizing Google Calendar reminders: at the moment I am only using default fields, but there’s extensive customization for events
- Knowing if a reminder is already set for a specific game: it would be helpful to know if I’ve already created a Google Calendar event reminder for a game. To do this, I could create a reference to the event using (after creation) and tie that set of events to a user. The edge cases could get complicated (ex. user creates event using the app, then deletes the event on google calendar), but I think it could be worthwhile.
- Cleanup strategies for game releases that have already passed: it could be a small amount of data with only a few users, but maintaining that data could become expensive with a large set of users. A strategy to, for example, purge the app db references to created events after x period of time (6 months?) might be a way to save space over time.
Next, I think I’ll implement a user model (with PostgreSQL), and a sign-up flow, eventually coming back to build on some feature ideas I’ve laid out above.
I know this post wasn’t code heavy at all, but the next one will contain more code snippets. Thanks for reading.
-
Games Cal: Detail Cards
Recently, I’ve been working on detail cards for individual games. In other words, creating a way to more meaningfully engage with the list of titles presented in the calendar view. Here’s a snippet of it in action:

This post will be split into a few sections:
- Creating the detail popper
- Cover art and data population
- A popover to show hidden games
Creating the detail popper
As a user, I want to interact with a game listed on the calendar to get more information. My first instinct was to use a modal component, but I ultimately decided against this for two reasons: 1. I didn’t want to block scrolling to/clicking on other parts of the page, and 2. I wanted to avoid a component laying on top of the current view.
For context, a popper is a fancy wrapper component to position a popover or tooltip in the UI. The material UI library has a popper component I researched and built on top of for my use case.
To handle clicks on individual items on the calendar, the FullCalendar library exposes an eventClick prop. It comes with a prop, info, that has all of the data related to the event, as well as an HTML reference to the location of the click. Popper requires the anchorEl prop to determine where the pop-up should appear. Without it, the popper will just float in a corner of the screen.
The flow to create a popper on a calendar click event is as follows:
- specify eventClick prop on Fullcalendar component
- define a function with:
- criteria for opening / closing the popper
- the anchor element for the popper
- any data necessary for the popper
When the open prop is true, the popper opens and data is passed to it. The next section talks about displaying data passed to the popper.
Cover art and data population
This is a close-up of the detail card in its current iteration. I have game cover art centered at the top, followed by information related to the game. There isn’t too much going on with this card as what is presented is read-only. The most interesting thing that’s going on is fetching the cover art (detailed below).
const fetchImage = async () => {
    if (cover !== undefined && cover.id !== undefined) {
        let replaced = cover.url.replace('t_thumb', 't_cover_big');
        const res = await fetch(`https:${replaced}`);
        const imageBlob = await res.blob();
        const imageObjectURL = URL.createObjectURL(imageBlob);
        setImg(imageObjectURL);
    }
    setLoading(false);
};

useEffect(() => {
    setLoading(true);
    setImg(placeholder_img);
    fetchImage();
}, [cover]);
In the block above (starting with the useEffect hook), as the popper component is created, a loading spinner is displayed and placeholder image loaded as the cover art is fetched. Once loaded, the cover art replaces the placeholder. This usually happens in the blink of an eye, but occasionally you do see the loading spinner for the cover art.
A popover to show hidden games
I wanted a way to gracefully handle days where a ton of games are releasing. In the vanilla component, this is what that (less user-friendly) case looks like:
Ideally, I wanted a cutoff with a click to reveal the remainder of games. Fortunately, there are calendar props that allow you to control this, dayMaxEvents and dayMaxEventRows. If you set dayMaxEvents to true, the calendar will control the breakpoint for hiding further events based on window size. This is what the view looks like:
That’s progress, but after looking through the documentation, I couldn’t find a way to control the display when the view more button is clicked.
Above is what my solution looks like. My approach for this was to:
- set dayMaxEvents to true
- overriding the FullCalendar popover by passing ‘ ‘ to moreLinkClick
- adding a click listener for show more games
- inflating a custom popover
My click listener took some finessing, but the below gets the games based on the date and uses some js to only populate the hidden games.
useEffect(() => {
    const getHiddenGames = event => {
        if (event.target.className === 'fc-daygrid-more-link fc-more-link') {

            // get and format the date
            const displayedDay = event.target.offsetParent.offsetParent
                .firstChild.textContent
            const twoDigitDay = displayedDay.length === 1
                ? `0${displayedDay}` : displayedDay
            const fullDate = calendarRef.current.calendar.currentData.viewTitle
                .replace(' ', ` ${twoDigitDay}, `)
            const formattedDate = moment(fullDate, "MMM DD, YYYY")
                .format('YYYY-MM-DD');

            // filter events for hidden games
            const hiddenGames = events
                .filter(entry => entry.start === formattedDate)
                .sort(function(a, b) {return a.title.localeCompare(b.title)})
                .slice(-parseInt(event.target.title.split(' ')[1]));
            setSelectedDate(fullDate);
            setHiddenGames(hiddenGames);
            setHiddenGamesAnchorEl(event.target);
        }
    }
    window.addEventListener('click', getHiddenGames);
    return () => window.removeEventListener('click', getHiddenGames);
});
Within the link click event, I’m:
- getting the day of the event click
- ensuring that it is two digits long
- placing the two-digit day into the calendar date (ex. ‘July 2023’ –> ‘July 06, 2023’
- formatting the date (ex. ‘July 06, 2023’ –> ‘2023-07-06’)
- filtering the total list of games by date, sorting that list in alphabetical order, and then returning only the portion of games that are hidden
I’m then passing that list of games to a popover component and using the existing popper component to display detail information.
Wrapping up, some random thoughts around this work
- Positioning the popper element is an art (read: when it opens, sometimes content continues beyond the visible boundaries) I have yet to master
- In an ideal world, I will be prioritizing the display of games based on ‘popularity’ or some other weighted feature. This would likely take significant time to develop, but I think would be a useful feature
I’ve had a lot of fun working on this so far. Next up for functionality, I think I’ll do some research into creating reminders to track upcoming games (google calendar, text message, etc.). Thanks for reading!
-
Games Cal: Filtering
Last post, I worked on making a call to the IGDB API and rendering a processed response in the UI.
For the past week and a half, I’ve been working on filtering functionality. A philosophy I’ve adopted from some developers I respect “get all the data from the server, then filter on the front end.” (This works for many cases, but where the data set is quite large, tools like graphql can really help)
At the moment, I’m accounting for two filter criteria: platform and genre. The gif below shows the results.
Backend
Thankfully I had done groundwork up front when I was working on handling the API response. In an earlier commit, I included handling platforms for a game. From there, adding in genre was fairly straightforward, with one caveat: not all games have genres defined. I only found this out when I was looking through a few example response objects. The genres field is slightly different from the platforms field, where all games have platforms defined.
Here is an example of raw response data (edited to make a point):
{
    "id": 29914,
    "name": "Animality",
    "release_dates": [
        {
            "id": 72645,
            "date": 1485993600,
            "human": "Feb 02, 2017",
            "platform": {
            "id": 6,
            "name": "PC (Microsoft Windows)"
            }
        },
        {
            "id": 471833,
            "date": 1684972800,
            "human": "May 25, 2023",
            "platform": {
            "id": 130,
            "name": "Nintendo Switch"
            }
        }
    ],
    "genres": [
	"Role-playing (RPG)",
	 "Adventure"
    ],
}
I take that response object and map the game to a given date, adding in fields for a list of platforms and a list of genres. Here is what an example of the mapped data looks like:
[
    {
        "date": "Jun 01, 2023",
        "games": [
            {
                "name": "Etrian Odyssey: Origins Collection",
                "platforms": [
                    "Nintendo Switch",
                    "PC (Microsoft Windows)"
                ],
		"genres": [
		    "Role-playing (RPG)",
		    "Adventure"
		],
            },
    }
]
Side note: list comprehension in Python
Python has really powerful methods for working with lists. List comprehension, once you get the hang of the syntax, offers concise statements for what would otherwise be verbose declarations. To deal with nested objects and lists, some that contained ‘null’ data, I started off with nested for loops. Once I got used to the structure, I worked my backwards into list comprehension, eventually producing the following statement:
genres = [genre['name'] for genre in res['genres']] if res.get('genres') else []Frontend
A user chooses a combination of platforms and/or genres they want to see releases for and when the filter button is clicked, the set of games matching the selected criteria are shown. This is my filtering function:
const applyFilters = game_data => {
// 1. check for filter criteria
    let hasFilters = consoleFilters.length > 0 || genreFilters.length > 0;

// 2. set a variable we're going to manipulate and return
    let filtered_games = game_data;

// 3. do filtering based on selected filter criteria
    if (hasFilters) {
        if (consoleFilters.length > 0 && genreFilters.length > 0) {
            filtered_games = game_data.filter(
                game => game.platforms.some(
                    console => consoleFilters.includes(console)
                )
                && game.genres.some(genre => genreFilters.includes(genre))
            );
        } else if (consoleFilters.length > 0) {
            filtered_games = game_data.filter(
                game => game.platforms.some(
                    platform => consoleFilters.includes(platform)
                ));
        } else {
            filtered_games = game_data.filter(
                game => game.genres.some(
                    genre => genreFilters.includes(genre)
                ));
        }
    }

// 4. return filtered list
    return filtered_games;
}
This function is invoked in two cases, 1. when a user clicks the filter button and 2. when a user goes to the next or previous month. In both cases, I’m calling this on the full list of game data returned from the server call. This ensures that I’m able to return to the full list of games if I’ve already applied multiple filters.
In my next post, I’ll get into hover and click functionality for the games.
Thanks for reading.
-
Updating SSL Certs

You want me to do what now? You what can be intimidating? Doing things you’ve never done before. I know that growth happens when you extend yourself and go beyond your comfort zone, but that doesn’t make it any easier to stare into the void of the unknown.
In my case, I have been hesitant to touch an EC2 instance I have that’s running a web app I worked on a while back. Why? Well, it was my first deployment and I only vaguely have an idea of why things worked (even though much of the setup was done manually).
I launched the app in early March, and enabled SSL a few days later. If I’m going to be honest, I thought I made a document detailing how I enabled SSL, but when looking over it yesterday, I found myself scratching my head.
My SSL certificate issued from LetsEncrypt was set to expire this upcoming weekend, so like a good procrastinator, I thought I’d open up the black screen of my ec2 instance a few days before. In my defense, I’d done some research months ago to document renewal and automation, so I wasn’t starting from complete 0.
For some reference on my setup, to install certs my first time, I created a standalone docker container that downloaded and ran a certbot image. I then made some changes to my production default.conf files to incorporate the new certs and enable a https connection. I then restarted my nginx web server and my site went from http to https! (the setup I followed will be linked at the end)
I thought that to update my certificate, I would generally have to:
- re-run the certbot image to update the certs
- rebuild the nginx docker container in the background to pick up the changes
- use a tool to test/verify the new expiration date
Running the certbot docker yaml file did not yield the results I was expecting.
certbot-service  | Challenge failed for domain somerandomquotes.com
certbot-service  | http-01 challenge for somerandomquotes.com
certbot-service  | Notifying user:
certbot-service  | Certbot failed to authenticate some domains (authenticator: webroot). The Certificate Authority reported these problems:
certbot-service  |   Domain: somerandomquotes.com
certbot-service  |   Type:   unauthorized
certbot-service  |   Detail: 54.85.4.220: Invalid response from http://somerandomquotes.com/.well-known/acme-challenge/hQgnMf3rLv_TbiUJ160puK_FiAOfMBApzpiuk2m3N9I: 404
certbot-service  |
certbot-service  | Hint: The Certificate Authority failed to download the temporary challenge files created by Certbot. Ensure that the listed domains serve their content from the provided --webroot-path/-w and that files created there can be downloaded from the internet.
There are some good hints in there, I’m sure, but my first instinct was to re-run the script with a -v flag for more verbose output messages. It did help and it didn’t help. More information is good, if you know what to do with it. In this case, I had more to potentially Google and figure out.
I spent a couple of hours searching around, seeing if problems that other people faced seemed similar to my own. I tried out a few solutions like updating my nginx config (link), but nothing seemed to really work.
After eventually restarting my ec2 instance and re-running a dry-run certbot renew command, I was able to pass validation, but I have no idea what was the thing (or set of things) I did to make it happen.

When something works and you don’t understand why I’m not sure what exactly did it, but here are things I did:
- added additional listeners for ipv6 addresses in my prod default.conf file (credit), probably what did it
- including a listener for /.well-known/acme-challenge/ in the ssl section of the default.conf file (which I don’t think actually helped)
- rebuilt my container images (by re-running docker-compose prod file)
- stop and restart the containers (with the newer images)
- restart the ec2 instance
- follow the certbot documentation for renewal (link)
With this, I was able to update my ssl cert and after checking, I won’t have to “worry” about this until September!
new certificate deployed without reload, fullchain is
/etc/letsencrypt/live/somerandomquotes.com/fullchain.pem
- - - - - - - - - - - - - - - - - - - - - - - - - - - - - - - - - - - - - - - -
Requested authenticator webroot and installer None
Notifying user:
- - - - - - - - - - - - - - - - - - - - - - - - - - - - - - - - - - - - - - - -

- - - - - - - - - - - - - - - - - - - - - - - - - - - - - - - - - - - - - - - -
Notifying user: Congratulations, all renewals succeeded:
Congratulations, all renewals succeeded:
Notifying user:   /etc/letsencrypt/live/somerandomquotes.com/fullchain.pem (success)
  /etc/letsencrypt/live/somerandomquotes.com/fullchain.pem (success)
Notifying user: - - - - - - - - - - - - - - - - - - - - - - - - - - - - - - - - - - - - - - - -
- - - - - - - - - - - - - - - - - - - - - - - - - - - - - - - - - - - - - - - -
no renewal failures
### command to get expiration date: sudo openssl x509 -enddate -noout -in fullchain.pem notAfter=Sep 10 21:08:50 2023 GMTUltimately, I still want to automate this process by configuring a cron job to obtain new certs and modify my nginx docker service to pick them up, but I’ll take this first step of making sure that my ssl didn’t expire!
Some takeaways
- new things are scary, but do them anyways! (beginner’s mind is 👍)
- docker is powerful, but like all tech, has a somewhat steep learning curve
- for my next project, I probably want a bigger ec2 instance (the one I have is quite cheap, but small and most importantly, slow)
Resources
-
Video games API + React UI
IGDB API + FullCalendar React Component
Starting off, I just want to say, it’s easy in the course of building something, to forget to celebrate the small wins. This blog entry is a reminder for myself to celebrate the small wins.
After figuring out how to make API requests with the IGDB API and format the response in JSON by date, my recent task has been to find a way to visualize the API response in a browser. Because I want to view them in monthly increments (as a proof of concept), I’ve been poking around for a react calendar component and happened upon FullCalendar.io.
Here is the result of the past week:
TL;DR: in the gif above, I’m clicking the next month button, which is sending a request to the IGDB API, displaying a loading spinner, and populating a list of video game releases for the next month (August, then September)
General process of how I got to the above (mostly front end stuff):
- installed the fullcalendar npm package locally and implemented a vanilla component in a .js file
- experimented to see how it would display a list of json events
- used a json file with a list of video games for June
- installed moment.js to perform some date conversions
- mapped over game data to create a format that the react component recognized
- created a listener for the next + previous buttons (so I could make API calls for game releases)
- this took more time than I’d like to admit 😅
- ended up creating a listener for a click event, updating a hook, and making an API request based on the hook value change
- installed axios to facilitate the API request
- I spent a few hours running into a 404 error with my axios requests. I thought the problem was with my server-side logic, but it turns out I was missing a front-end proxy to my django code! Oops, just glad it didn’t take more time
- rendered react-spinner component while waiting for the API response, adding some formatting to make it look pretty-ish
- implemented useEffect() hook to set the month on page load (with an empty dependency array) to make sure I was loading data for the current month
Observations + open questions
- The API request + response process could be improved
- Maybe I could implement a caching mechanism to reduce load time
- Could also improve the python API request logic for added efficiency
- Not sure how to scale authentication for lots of requests
- the IGDB API requires auth to use (had to register my app with Twitch, the maintainers of the API) and while fine for an individual user, a bunch of users and a bunch of requests could really complicate the process
- Need a way to prioritize display of popular games
- there’s no inherent way to do that in the current iteration of the API (which they explain is a result of a subjective and changing definition of popularity)
- maybe there’s a way to scrape several sites for anticipated upcoming releases and then aggregate +/ assign a weight to those games?
- I still feel really inexperienced with Django (and python classes). Familiarity and comfort will come with time and experience, but I feel like I’m barely scratching the surface in terms of comprehension and functionality
What’s next
I have been meaning to get a private repo started (oops). Now that I have this much working locally, I think now is the time. It might also be time to get this running in some docker containers.
In terms of functionality, I think the next couple of things I’m curious to implement are filters for platforms and customizing the display of events in a given day.
-
Transforming API responses: IGDB API
I. Background
In the past, whenever I wanted to find out when video games are releasing, I would have to consult a giant list of all release dates in a laundry list format (ex. 1, ex. 2). In an ideal world, it would be cool to have an app, something like Google Calendar, that could give me all of the games coming out in a given month, in a user friendly, digestible format.
I’ve been researching various API to see if there are open source API for video game data and after some digging around, I happened upon the IGDB API. They have pretty good documentation for getting up and running and have generous open source access.
II. Approach
As far as I can tell from the documentation, it’s not possible to request games releasing on a particular date, as the release_dates endpoint can only return a single game reference ID, so my approach is to request games with a version releasing in x month, and then transform + filter as needed to group together games based on release date.
The IGDB API has a pretty standard request flow — register your app (through Twitch), authenticate with a client id + client secret, then use the access token on subsequent requests — so it was fairly quick to get going. At first, I started playing around with the API in Postman to get a feel for the nuts and bolts of syntax. Once I had a sense of that, I played around with executing requests in a .py file, but I ran into some some trouble making requests (which were thankfully solved by using the python wrapper).
For my experiment, I do the following:
- send an authentication request (w/ client id and client secret)
- (use the access token in the response to make subsequent requests)
- request data for games releasing in a given month
- parse through the data in the response, transforming the data in the process
- write the output to a .txt file (in prod, would write to a db)
My general thinking is that, when the application handles this data on the front end, games would be displayed based on when they release (think something like the Mac Calendar app or Google Calendar).
III. API Transformation
My goal thus far has been to transform the API response grouping together games by release date. A example request + response I’ve gotten from this API looks like this:
Request URL:
POST https://api.igdb.com/v4/games/
Query:
fields name, release_dates.human, release_dates.date, release_dates.game.platforms.name;
where release_dates.date >= 1641016800;
limit 5;Response (as an array of game objects):
[
    {
        "id": 52,
        "name": "The Elder Scrolls: Arena",
        "release_dates": [
            {
                "id": 97271,
                "date": 764553600,
                "game": {
                    "id": 52,
                    "platforms": [
                        {
                            "id": 6,
                            "name": "PC (Microsoft Windows)"
                        },
                        {
                            "id": 13,
                            "name": "DOS"
                        }
                    ]
                },
                "human": "Mar 25, 1994"
            },
        ]
    },
]
The API response has games info with the ability to also query for release dates, which come as an array of individual platforms. My goal was to group the responses by date, similar to the below:
[
    {
        "date": "May 12, 2023",
        "games": [
            {
                "name": "Zelda: Tears of the Kingdom",
                "platforms": [
                    "Nintendo Switch",
                ]
            },
            {
                "name": "The Tower Between Us",
                "platforms": [
                    "PC (Microsoft Windows)"
                ]
            },
        ],
    },
    {
        "date": "May 24, 2023",
        "games": [
            {
                "name": "Sunshine Shuffle",
                "platforms": [
                    "PC",
                    "Nintendo Switch",
                ]
            },
        ],
    },
]
Parsing through the API response was tedious (and in this first iteration likely quite inefficient), but after lots of trial and error, I was able to transform the data into a readable and reliable format.
To execute the program through the command line, I can pass in a year and a month (similar to what I imagine on a typical client request), and can get back a list of games that are releasing in that target month!
I won’t go into the individual logic (some comments in the implementation), but below is the gist of the approach:
from igdb.wrapper import IGDBWrapper
import json, os, sys

month_dict = {'1' : 'Jan', '2' : 'Feb', '3' : 'Mar', '4' : 'Apr', '5' : 'May', '6' : 'Jun', '7' : 'Jul', '8' : 'Aug', '9' : 'Sep', '10' : 'Oct', '11' : 'Nov', '12' : 'Dec'}

def get_games_by_month(year, month):

        wrapper = IGDBWrapper(
             str(os.getenv('IGDB_CLIENT_ID'),
             str(os.getenv('IGDB_AUTH_TOKEN')
        )

        api_request = wrapper.api_request(
            'games',
            'fields name, release_dates.date,
             release_dates.human, release_dates.platform.name;' +
            'where release_dates.y = ' + year +
            '& release_dates.m = ' +  month + ';
            limit 500;'
        ).decode('utf-8')

        response_data = json.loads(api_request)

        date_map = []

        # transform API response
        for res in response_data:
            game_release_dates = res['release_dates']

            for platform_release in game_release_dates:
                human_date = platform_release['human']
                platform = platform_release['platform']['name']
                selected_date = {}

                ## see if date already exists in date_map
                for date_object in date_map:
                    if date_object['date'] == human_date:
                        selected_date = date_object
                        continue

                ## if date is present, update games and platforms
                if bool(selected_date):
                    games_list = selected_date['games']
                    containsGame = False

                    ## update platforms for games in the games_list
                    for game in games_list:
                        if game['name'] == res['name']:
                            game['platforms'].append(platform)
                            containsGame = True
                            continue

                    ## add game for selected date if not added yet
                    if not containsGame:
                        games_list.append({
                             'name': res['name'],
                             'platforms' : [platform]
                        })

                ## add date to date_map if it doesn't exist in list
                elif human_date[-4:] == year and
                human_date[:3] == month_dict[month]:
                    entry = {}
                    entry['date'] = human_date
                    entry['games'] = [{
                         'name': res['name'],
                         'platforms' :[platform]
                    }]
                    date_map.append(entry)
        # sort all of the dates
        date_map.sort(key=lambda data: data['date'])

        # dump everything into a file
        json_dump = json.dumps(date_map, indent=4)
        filename = "releases_" + year + "_" + month + ".txt"
        f = open(filename, "w")
        f.write(json_dump)
        f.close()
IV. Considerations
Because game release dates are fairly static (there aren’t hundreds of games releasing every month and release dates aren’t updated often), I’m not too worried about the performance of this method. I imagine that most of these release dates could live in a database with a separate service listening for updates to release dates periodically.
Flow
Each time a user makes a request on the front end, the app first checks the database for information corresponding to that month. If it exists, return the requested info. If it doesn’t exist in the database (i.e. a query for that month has never been requested before), make a request to the IGDB API, perform some transformation, return the data to the client, and separately make sure to store that info in the database.
V. Next Steps
Now that I have something working locally, I think my next step is to look for an open source calendar component I can play around with. I’d love to open up localhost, have the calendar display the current month, with the games list populated as expected. I have a lot of ideas for potential features of this app (so maybe I should create a project board in Trello or something), but for now, I’m just focused on my next step.
Thanks for reading.
- send an authentication request (w/ client id and client secret)
-
Signup + email verification project (django/react)
Some context!
Many years ago, when I was working on a team project in a coding bootcamp, I was responsible for handling login functionality (designing the front-end form, sending a login + token request, storing the access token in localstorage, authenticating those requests with the local token).
I barely knew what I was doing at that time, and though I got some things working, I wasn’t able to create a reliable implementation of a login flow. Since then, I’ve been a bit afraid of having signup + authentication be a part of my projects.
Fast forward to today. I’ve been using react for a few years here and there, but am much newer to python (and django). I’m resilient enough to keep pushing, so I wanted to create a web app with some basic features:
- Signup functionality
- Logged in / logged out experience (reflected with nav bar changes)
- Verification email with redirect URL to site
Back end (django + simplejwt)
The basic flow of (this) authentication is:
- client requests authorization using login credentials
- server verifies credentials, returning a token if successful
- client sets authorization header with the returned token for subsequent requests
- when a token expires, a refresh token is used to generate another access token and refresh token pair
For authentication and creating a JSON web token, I used the djangorestframework-simplejwt python package. The basic steps include modifying settings.py and adding url paths to access token + refresh logic.
installation
pip install djangorestframework-simplejwtsettings.py
REST_FRAMEWORK = {
    ...
    'DEFAULT_AUTHENTICATION_CLASSES': (
        ...        'rest_framework_simplejwt.authentication.JWTAuthentication',
    )
    ...
}
urls.py
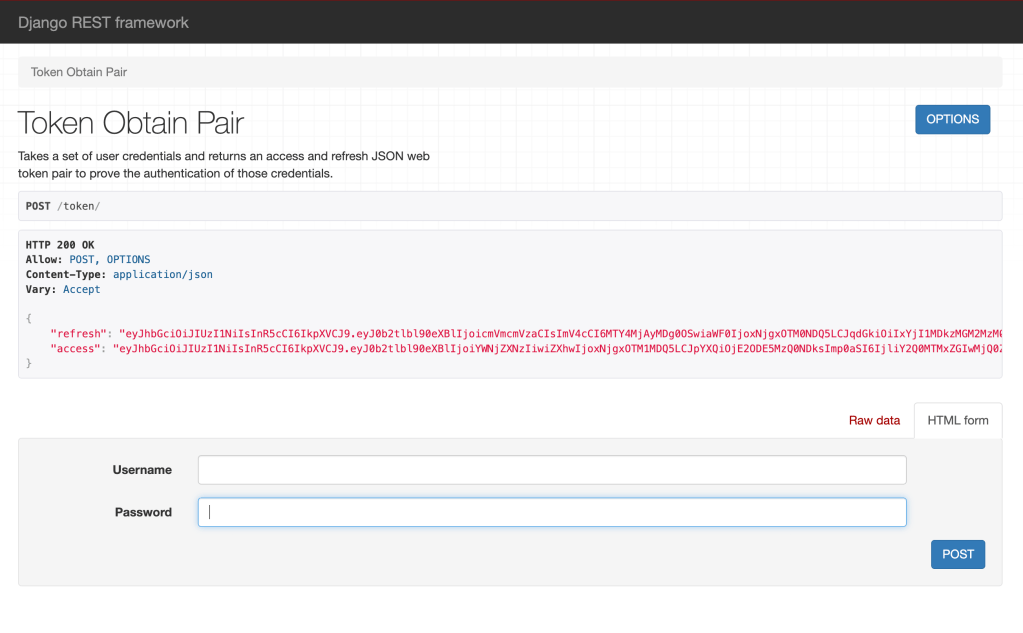
from django.urls import path
from rest_framework_simplejwt.views import {
    TokenObtainPairView, TokenRefreshView
}

urlpatterns = [
    path('token/', TokenObtainPairView.as_view(), name='token_obtain_pair'),
    path('token/refresh/', TokenRefreshView.as_view(), name='token_refresh'),
]
After these steps, I created a superuser, and tested using a combination of the admin portal (localhost:8000/admin) and postman (to set headers, etc.):
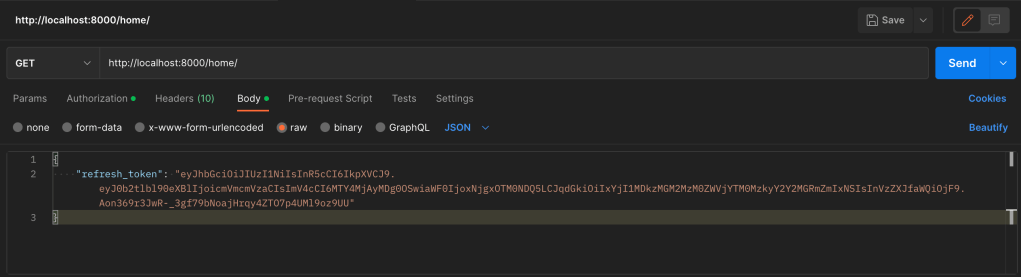
Hit ‘token/’ route using login credentials (in localhost:8000):

This should return an access token and refresh token:
Using the access and refresh values from the response, set appropriate variables in Postman (access token, header, and refresh token in the body).
Authorization | ‘access‘ value from response
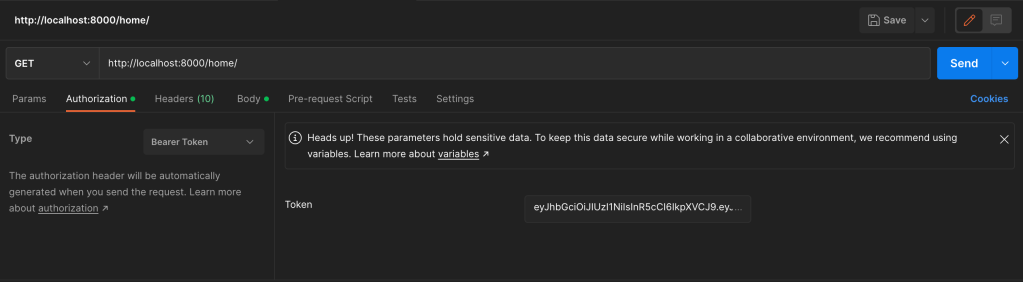
Headers | Key: ‘Content-Type’, Value: ‘application-json’

Body | ‘refresh‘ value from ‘token/‘ API call
After that, I hit a route to retrieve logged-in information to make sure that the authenticated endpoint works.
Front end (react)
The front end is made up of 3 main pieces:
- Signup
- Login
- Logged-in view
This basic flow works as described below.
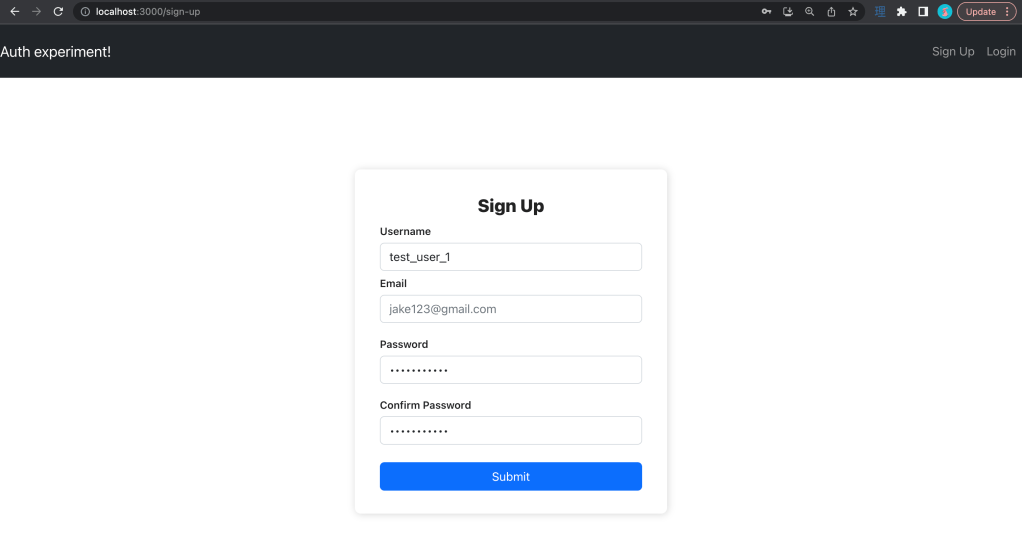
A user goes through a sign-up page to sign up for an account.
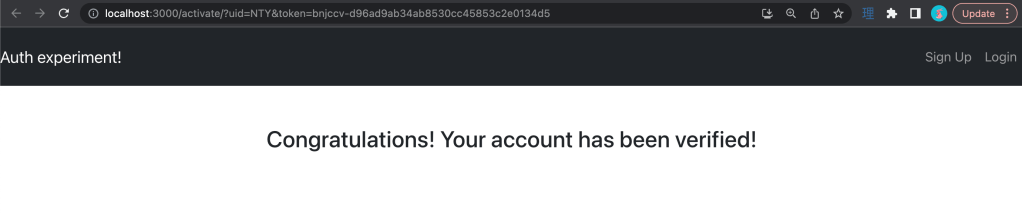
Upon form submission, the user is redirected to the login page with an account verification/activation email sent to the email from the signup form (see email implementation help in sources)

In an email, a user receives an activation link. When clicked, the link takes them to the site and ‘activates’ their account (in other words, is_active on the user model is turned to true)

Once an account is ‘activated’ the user can log in. When a user is logged in, they’re taken to a page where the navigation appears different (below).

The signup flow could be orchestrated in many ways, but in this project, I’ve chosen to explicitly turn off the is_active flag on the user model until the user clicks on the redirect link from the email.
A few things to call out
Local storage: so right now, I’m taking the response from the login call and setting a key-value pair for access + refresh token values. I’m changing the navigation bar options based on whether or not the access token is present (and using that token to authenticate subsequent requests). I also have an axios interceptor that checks for expired tokens and tries to access a ‘token/refresh’ endpoint to get a new set of tokens.
Activation redirects: in production, I’d likely use a combination of gunicorn and nginx to serve as a WSGI server + reverse proxy , but in my localhost example, I’m explicitly hardcoding the url. I had to do some finagling to add parameters to the url. Separately, as an additional feature, I could add in logic to handle cases where the link expires or the user somehow lost the first email (perhaps I will in the future).
Signup form validation: as of this writing, I don’t currently have validation on the signup inputs (username, email, and password). There are many libraries that handle this, but this wasn’t in scope for me to get signup + authentication up and running (though, if I decide to work further on this project, I’ll most likely build that in form validation)
Email server: I didn’t know this, but the django.core.mail package contains logic to fire off emails. It was pretty straightforward to configure and use! I was surprised how easy it was to configure, but glad I didn’t have to spend a long time figuring it out. There are a few links around emails in the sources if you’re interested.
Some final thoughts
I’m glad that I could get a straightforward implementation of a basic authentication flow up and running. I think I’ll incorporate elements of this project into other projects going forward.
Django comes with some pretty robust user creation and authentication packages out of the box. I thought a lot about creating my own user models or extending the existing user model. I put a couple of sources down below that helped me think about my options.
The repo can be found here.
Sources:
extending the django user model
customizing the django user model
sending emails with django + google smtp
-
久しぶり and recent projects
It has been a moment since I last penned a post, though I have been working on stuff. I’ll write a bit more frequently going forward. I don’t quite have a cadence worked out in my head, but my goal right now is more than a few times a month.
I plan to dive into some of these a bit more, but in the past 8 weeks or so I’ve, been:
- Getting my first website up and running on AWS! (EC2 + Docker Compose)
- Playing around with openai image generation for a site logo (for the aforementioned site)
- Experimenting with the igdb api set (for a potential video games calendar project)
- Creating a django/react signup and email verification flow for future projects
A few musings from the past weeks:
- Understanding takes time. This isn’t particularly novel, but I often remind myself that it takes time to form understanding around things I haven’t done before, and it’s okay to not know the answers up front when seeing something for the first time
- Consistency matters. Getting better over time requires repeated effort, and necessitates time spent doing the thing at the cost of doing other things. It’s not glamorous, but (hopefully good) routines do build habits, and habits do lead to forward progress, over time
- Output matters. In learning about how the web works (among other topics), writing code is often one of the best ways I find I form understanding, even if it’s just copying what someone else has written and perhaps tweaking one or two things. I’ve also learned that I will write a ton of things that do not work, thousands of lines of code that will never get used, but were useful in the moment for learning
- There will always be more to learn. There have been a lot of humans working on many things for a long time. At this point, there’s a vast ocean of knowledge and experience that is impossible to master because I won’t have enough time on this earth. It’s exciting to think there will always be something to learn about, to expand my understanding of, but it’s also a humbling fact to let sink in — time is limited
- Creativity is born from spending time understanding what already exists. Few things come from complete nothingness. Many things are derivations of what already surrounds us. Learning requires copying to experience and understand, to prepare someone to experiment. Breaking the rules (intentionally) means you have to know what they are well enough to know how to stretch the limits!
- Progress is not linear. This can be hard to stomach sometimes, but the path from point A to point B is, for better or worse, not always linear. It’s okay if things take longer or more time than anticipated – that’s part of the journey. In times where I get down on myself for not knowing this or that, I remind myself that these things are not easy and that growth will happen in fits and starts. What’s important is showing up time and again to do the hard things. Over time, the hard things become more manageable.
Till next time. – 孤独を愛する人間
-
Docker pt. 2 – containerized!
So after fooling around with docker at a coffee shop for about 5 hours, I was able to get my app running in docker with docker-compose!
How I got up and running:
Research: I had seen a lot of different docker flavors out there so I wanted to jot down some notes on what I found each one did from some basic searches:
- docker-compose: running multiple docker containers w/a single source
- docker swarm: a mechanism for clustering docker engines (seems out of scope for what I want at the moment)
- docker hub: a repo (for docker configurations) kind of like github
Along the way, getting up and running, I was trying to keep a few things in mind:
- a lot of the tutorials I saw had django working with postgres, which made sense at larger scale, but for me running sqlite, it seemed like overkill
I was following aspects of the following articles, which I found helpful for different parts (they were django tutorials):
- https://faun.pub/tech-edition-how-to-dockerize-a-django-web-app-elegantly-924c0b83575d
- https://www.honeybadger.io/blog/docker-django-react/
Process
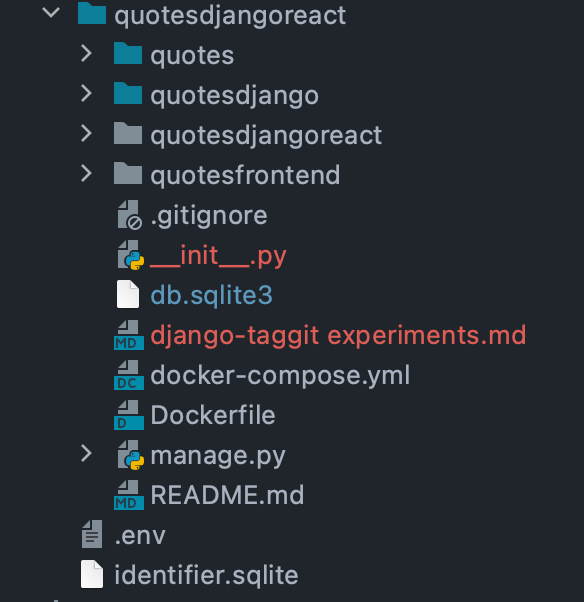
I started by creating a Dockerfile for my backend api (pictured below in quotesdjangoreact) and then a separate one for my frontend (quotesfrontend).
Once I had those two files, it was time for me to create a docker-compose.yml file to bring running those containers together! Here’s what I currently have for my basic setup.
version: '3.8'
services:
  api:
    build: .
    ports:
      - "8000:8000"
    command: python manage.py runserver 0.0.0.0:8000
  web:
    build: ./quotesfrontend
    ports:
      - "3000:3000"
    volumes:
      - ./quotesfrontend:/quotesfrontend
Once I had a docker-compose file written, it was time to try and get the containers up and running! I built and ran docker compose with the following commands:
docker-compose builddocker-compose upThe first command built the image and took maybe a minute or so to completely build.
After that, docker-compose run got my two containers running and talking to one another!
Troubleshooting
So along the way, I encountered 3 issues that I needed to solve once I saw the container was up and running.
- Mounts denied
- Connection refused
- Disallowedhost: Invalid http_host header
Error response from daemon: Mounts denied:
The path /quotesdjango is not shared from OS X and is not known to Docker. You can configure shared paths from Docker -> Preferences... -> File Sharing. See https://docs.docker.com/docker-for-mac/osxfs/#namespaces for more info.
1. Mounts denied: It took a while tinkering around with solutions from various links, but eventually the following couple of links helped me get past this one:
- https://stackoverflow.com/questions/45122459/mounts-denied-the-paths-are-not-shared-from-os-x-and-are-not-known-to-docke
- https://medium.com/effy-tech/fixing-the-var-folders-error-in-docker-for-mac-v2-2-3-2a40e776132d
Proxy error: Could not proxy request /api/auth/token/obtain/ from localhost:3000 to http://localhost:8000 (ECONNREFUSED).2. Connection refused: the eventual solution that worked for me was to change the proxy value from “http://localhost:8000” to the name that I was using for my docker-compose yaml: “http://localhost:8000” –> “http://api:8000”
Invalid HTTP_HOST header: 'api:8000'. You may need to add 'api' to ALLOWED_HOSTS3. Disallowedhost: Invalid http_host header: the solution to this problem wasn’t that difficult, but I forgot to update my docker environment so I kept seeing Invalid HTTP_HOST header: ‘localhost:8000’. You may need to add ‘localhost’ to ALLOWED_HOSTS when I knew that I had updated the appropriate value.
Moral of the story: don’t forget to tear down and rebuild your containers when you make configuration changes as sometimes that can be the simple thing you’re forgetting.
These commands can help save headache (not in all scenarios, but definitely in many of my experiences)
- docker-compose down
- docker-compose build
- docker-compose up
My journey with docker is just getting started, but so far, I really like the concept and benefits of containerization!
-
Subscribe
Subscribed
Already have a WordPress.com account? Log in now.
